How To Paint Dining Room Furniture
When we think of painted furniture, we often think of chairs or credenzas, bookshelves or desks. But, for many of us, the dining table is a vital piece of painted furniture. Dining tables are often one of the highest traffic horizontal surfaces in the entire home. They need to be able to withstand just about everything – eating, of course, but also much more: homework, craft and art projects, board games, and even the occasional wrestling match. It's important that your dining table's finish is up to the task…and in order for this to happen, you must start from the beginning.
 View in gallery
 View in gallery
This tutorial will take you through the process of joining the leaf to the dining table (permanently), priming, painting, and sealing your dining table so it lasts for many years to come.
 View in gallery
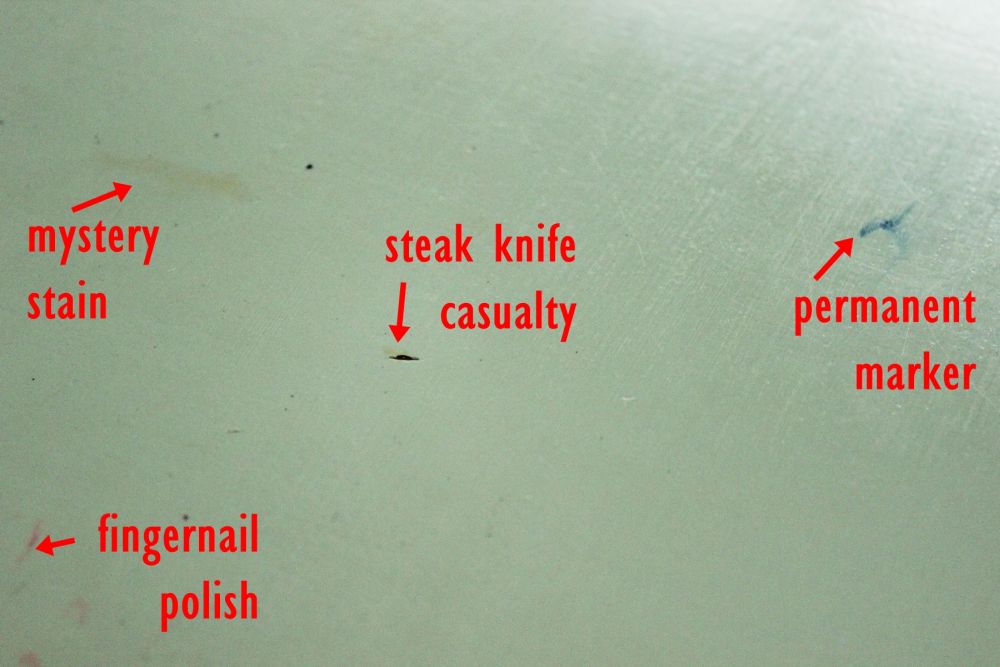
This table serves a family of seven, and it's got the battle scars to prove it.
 View in gallery
I could overlook the cosmetic defects (because that's part of life with five young kids!), but it was the cracks between the leaf and the rest of the table that got me motivated to make the change.
 View in gallery
These cracks were constantly collecting crumbs and gunk, no matter how I tried to stay on top of cleaning them out. The time had come to solidify the leaf to the rest of the table, and make it into one solid piece. (If you never take out your table leaf, you should definitely consider doing this. Your life will be changed forever, for the better.)
 View in gallery
Wash down all surfaces of your table with all-purpose cleaner. Be sure to wash the inside edges of the leaf and the table, where they touch.
 View in gallery
Grab some fine to medium sandpaper, such as 120-grit.
 View in gallery
Sand the inside (touching) edges of the leaf and the table.
 View in gallery
Use the 120-grit sandpaper to sand the entire surface of the table as well.
 View in gallery
Your table should be largely matte at this point, having sanded off much of the previous finish. Don't worry about going all the way through all the paint and finish, though, since you're going to be painting it again. You just want the surface cleared and roughed up enough that primer will stick to it later.
 View in gallery
Wipe off all the sanding dust.
 View in gallery
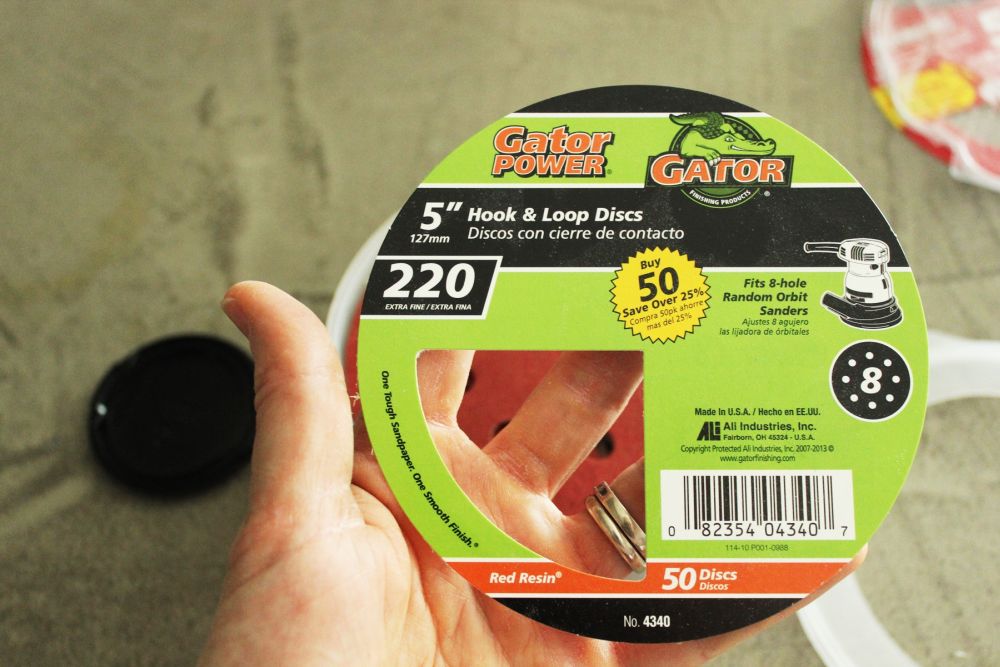
Now it's time to give everything a finishing sanding before moving onto the leaf-attachment step. Take some fine sandpaper, such as 220-grit.
 View in gallery
Place the leaf back in the table temporarily, and sand the pieces together as one piece. If your table is old like this one, you might notice that the table top surfaces don't match up precisely; one part might be a little higher or lower than the other part. That's okay, but it's also why we're sanding them together, trying to get them as flush as possible with this sanding pass.
 View in gallery
Wipe all sanding dust away thoroughly, including a clean swipe of the inside edges of the leaf and tabletop.
 View in gallery
Take some wood glue (I recommend Gorilla Glue wood glue).
 View in gallery
Run a decent sized bead of wood glue along the inside edge of your table. Don't do so much that it'll squeeze out significantly, but do enough that it'll help hold in place.
 View in gallery
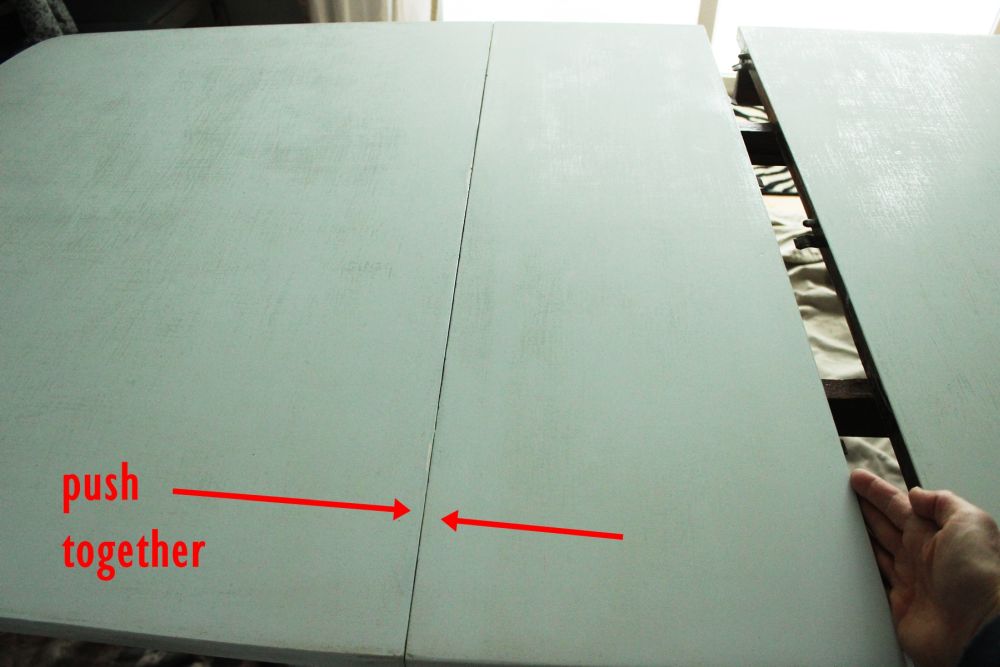
Place the leaf into place, and slide it up to the glued inside edge of the table.
 View in gallery
Press the two edges together firmly. Repeat on the other side of the leaf.
 View in gallery
Press the second edges together firmly as well. Your table should now be squeezed together as tightly as the leaf will allow. Wipe away any excess wood glue, if necessary, at this point. Much easier to do it now while the glue is wet.
 View in gallery
In order to solidify the tabletop attachment (wood glue is fine and all, but we need to really seal the deal), we're going to be adding metal brackets to the underside of the tabletop. Opt for a couple of long, straight brackets that will reach onto either side of the leaf and attach to both sides of the table as well.
 View in gallery
Take some 3/4″ wood screws.
 View in gallery
Double check that these screws are short enough to avoid puncturing through the tabletop when screwed in from the bottom. Looks like we're good to go with this size.
 View in gallery
Make yourself comfortable under the table with the box of screws, your drill, and your bracket all within easy reach. Line up your bracket so that none of the screw holes hits the crack between the leaf and table, if at all possible.
 View in gallery
Place a screw onto one end of the bracket that's on the tabletop side (as opposed to screwing into the leaf).
 View in gallery
Before screwing in the second screw, which should be placed onto the other side of the bracket (across the leaf on the other side of the table), pull the table together as tightly as you can. You may need to hook your feet around the table legs and your hands around the upper table legs, if you don't have someone to help you. You really want these table joints to be as tight and square as possible. Attach your bracket at the opposite end, then fill in the screw holes all the way down both table ends and the leaf.
 View in gallery
Shift under the table to the other half of the table, where you'll need to install a second bracket. Figure out the best place for it.
 View in gallery
Repeat the steps of bracket installation (attach to one end of the table, pull the table tightly together, then attach bracket to the opposite end of the table, then fill in the rest of the screws).
 View in gallery
You'll notice that your table probably looks, from the top, exactly the same as it did before. But you and I both know that it's stable and secure now, ready to be joined together permanently.
 View in gallery
Take some wood putty. This rock hard water putty (powder style, "just add water") is one of my absolute favorites when it comes to this kind of thing.
 View in gallery
Follow the directions on the container to mix powder with water. I believe I used about a 3:1 ratio. Stir it together with a disposable spoon or popsicle stick. You'll want to end up with a substance that is just slightly less sticky than peanut butter.
 View in gallery
Use a putty knife to press the putty into the crack on your table.
 View in gallery
Use the putty knife to also smooth out the putty and scrape away excess. You can (and will) sand this putty when it's dry as well, so don't worry too much about making it completely smooth.
 View in gallery
Work the putty into the side cracks and crevices as well, then use a toothpick (or whatever) to scrape away extra putty. This is an instance where sanding later on would be difficult, if not impossible, so you'll want to make these lines as smooth as possible while the putty is malleable.
 View in gallery
You'll have to work fast, because this putty sets up relatively quickly. Let the putty dry completely.
 View in gallery
Remember how this old table has an uneven surface at parts between the table and the leaf? I used the putty to try to split the difference in height. I sanded down a bit from the upper edge, and I'm building up the lower edge with putty. Ultimately, I want the table to be smooth, so if it has to slant slightly in some places, that's preferable than having a step-line running down the middle of the table.
 View in gallery
When the putty is dry, sand with 120-grit sandpaper. This step is so rewarding!
 View in gallery
After you wipe away the sanding dust, you're going to be amazed at how smooth the transition is between the putty and the actual tabletop. You might not be able to even feel it.
 View in gallery
If there are places that are uneven, though, or that you might have missed, go ahead and do a second layer of putty. Let it dry completely, then sand again.
 View in gallery
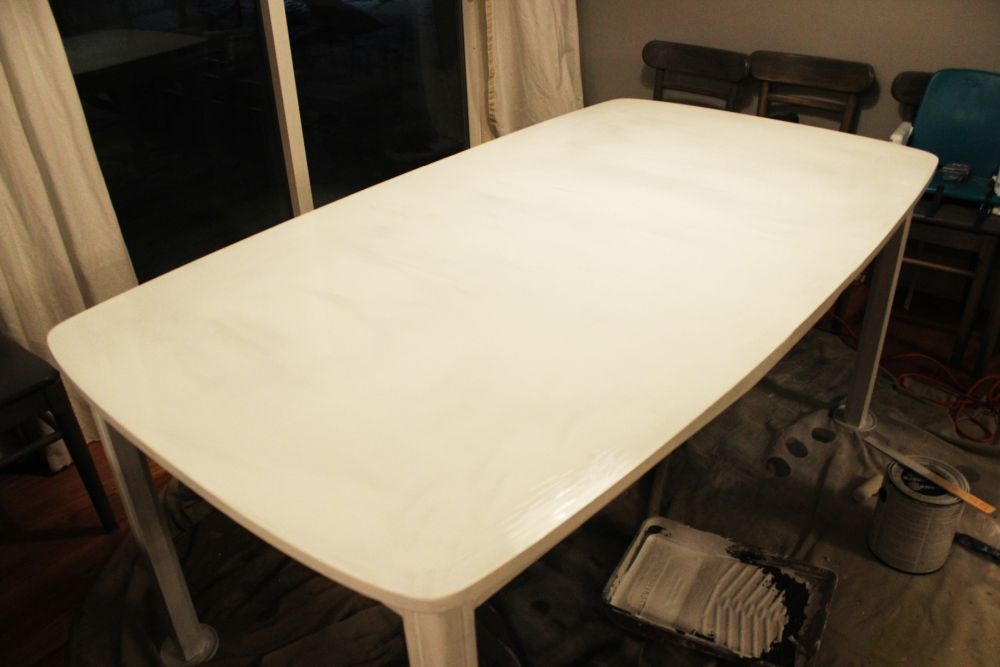
After you've wiped away all the sand dust with a damp cloth, it's time to prime your table. I prefer Zinsser water-based primer because it doesn't smell as much as the oil-based primer. (And, since it's winter, I'm doing this table renovation in my dining room itself. So fumes are a big deal.) What's more, though, is that water-based primer works very well underneath latex paint.
 View in gallery
Work the primer into all cracks, if your table has some decorative crevices, and corners. Don't overbrush. What that means is, once you've placed your primer (or, later, your paint or sealer), don't go back over it with the brush unless absolutely necessary, because it starts to "settle" right away. If you do, it will leave deeper and more noticeable brush strokes than if you just leave it alone after the first pass.
 View in gallery
Let the primer dry thoroughly.
 View in gallery
Lightly sand the first primer coat with fine (220-grit) sandpaper.
 View in gallery
Be sure to follow along your sanding path with your other hand, because your touch will be more telling as to the primer coat's smoothness than your eyes. Primer streaks might look uneven, but when you feel them, they might be smooth as can be. You don't want to keep sanding these parts, or you'll work your way all the way through the primer for no reason.
 View in gallery
Wipe away sanding dust.
 View in gallery
Apply a second coat of primer. You don't have to do this step, of course, but I like to and here's why: Paint will "take" differently to primer than to other surfaces. If there are some parts on your table that, for whatever reason, got the primer sanded off too much, these spots will likely look different when paint is applied. I recommend a second coat of primer to really provide a solid, seamless base priming coat. Let the second coat of primer dry, and sand again lightly with 220-grit sandpaper.
 View in gallery
It's time now to paint. There are several schools of thought on painting flat surfaces: (1) use a high-density foam roller, (2) use a regular roller, and (3) use a paintbrush. Although flat surfaces are meant to be its forte, I've never had great luck with the foam roller in painting a truly flat surface. It seems to leave air pockets behind that are tricky to sand down evenly. I prefer a combination of the regular roller and the paintbrush, actually.
 View in gallery
I happen to like the charm of a faint brush stroke on painted furniture, as long as it's tidy and neat and one-directional. After much experimentation, the best way I found to achieve this subtle look is as follows: roll a thin layer of paint onto a small section (e.g., the width of the table by one-paint-roller wide), then quickly and carefully run a wide paintbrush over the freshly rolled paint in long strokes (one side of the table to the other in one strok).
If you work quickly and in small patches, the paint will settle neatly and, in my opinion, charmingly with just a hint of brush stroking. Then move quickly onto a next section, rollingaother one-roller-wide strip down the width of the table (just to apply the paint) and brushing it in long, even, parallel strokes before it has a chance to settle. The key is being intentional and very, very fast at this. If you wait even 5-10 seconds too long before brushing the rolled paint, the rolled paint will begin to settle and will sort of clump up when you go to brush it. Paint the table legs and everywhere else with the paintbrush, keeping strokes running smoothly along with the "grain" of the wood (even if it's fake wood, and even if you can't see the grain).
 View in gallery
After the coat of paint has dried thoroughly and the surface is not at all tacky, sand lightly with 220-grit sandpaper. It's important to wait until it's completely dry; if you try to sand or paint on top of a coat of paint that hasn't dried, it will gum up or stay tacky forever. Neither of these are desirable outcomes for your painted dining table, so be patient and let it truly dry before sanding.
 View in gallery
Sanding will eliminate some of your brush strokes, and it will leave the surface looking matte and maybe speckled. That's okay, as long as the surface feels beautifully flat to your touch. Wipe off all sanding dust, and repeat the painting process. I recommend at least two coats of paint; for this dining table, I did a total of four coats of paint, sanding between each coat. Because seven people eat together at this table at least twice a day, and it sees more than its fair share of loving abuse.
 View in gallery
After your final coat of paint has dried completely, it's time to seal up your dining table. You may wonder what's the best type of sealer for a high-traffic piece like the dining table. In my experience, water-based MinwaxPolycrylic works the best. It doesn't yellow, it goes on smoothly, and when it cures completely, the surface underneath is very protected.
 View in gallery
You'll apply this sealer with your paintbrush. Apply it with brush strokes running in the same direction. If you have to pick up your paintbrush in the middle of a stroke, try to place your paintbrush down at the opposite end of your stroke and brush inward to where you originally picked up. This helps the point of paintbrush impact, as it were, be less apparent because it's on the edges.
 View in gallery
After you've applied this clear coat to all surfaces (including the legs and sides and top), walk around the entire dining table twice more, keeping your eyes peeled for anyplace there might be drips. As careful as we all are while painting, there will likely be a place or two where the paint has begun to run or drip. Brush these drips out (with just a slightly damp paintbrush; don't add more polycrylic for this step) while they're still wet to make your life easier in the long run. Follow the directions on your polycrylic can; basically, let your clear coat dry thoroughly (about 4 hours), then lightly sand with 220-grit sandpaper, wipe off sanding dust, then apply another coat. Repeat this process for two or three coats (three is recommended), but don't sand the final coat.
 View in gallery
When all is said and done, you should end up with a beautifully finished piece of painted furniture: your dining table.
 View in gallery
To be clear, when I say I kind of like brush strokes because they're charming, I not talking about deeply grooved brush strokes that are going in all directions! That's sloppy and distracting. I like a flat, even surface, of course. By working quickly while painting and sanding carefully between each coat, you'll get an even, smooth surface where it counts.
 View in gallery
But there's something about brush strokes, like the ones on this table leg, that makes me think of old-fashioned painted furniture at my grandma's house. It's charming because it's authentic. So I'm not going to sand away an entire coat of paint because it shows a brush stroke or two. Wet paint will settle; brush strokes will diminish if you just let the paint do its thing. You can always sand out the grooves.
 View in gallery
So, there you have it. A complete guide to eliminating the crumb-catching table leaf cracks and finishing off your dining table top to be a wonderfully smooth, sealed surface. I hope you've found this tutorial on this high-traffic, heart-of-the-home painted furniture piece to be useful and helpful. Happy painting!
How To Paint Dining Room Furniture
Source: https://www.homedit.com/painted-furniture/


Posting Komentar